
Spring (9) - View Template 3rd
- 개발 환경 준비 1)
- Spring IoC 1) 2)
- Spring MVC 1) 2) 3)
Database 활용- View Template 1) 2) 3) 4) 5)
- AOP / Filter / Interceptor
- File Upload / Download
Thymeleaf
Iteration, Conditional Evaluation
-
- ${#numbers.sequence(from, to, [step])}
- Thymeleaf의 Number Format 클래스 중 유틸리티 메서드인 sequence from에서 to까지 step(default=1)차이만큼 정수의 시퀀스 생성한다.
-
- #~
- Thymeleaf에서 제공하는 기본 객체(자바의 클래스)이다.
file\src\main\java\com\example\basic\controller\ThymeleafController.java
Java
1
2
3
4
5
6
7
8
9
10
11
12
13
...

@GetMapping("pagination")
public String pagination(Model model, @RequestParam(defaultValue = "1") int page) {
    int startPage = (page - 1) / 10 * 10 + 1;
    int endPage = startPage + 9;
    model.addAttribute("startPage", startPage);
    model.addAttribute("endPage", endPage);
    model.addAttribute("page", page);
    return "pagination";
}

...
file\src\main\resources\templates\pagination.html
HTML
1
2
3
4
5
6
7
8
9
10
11
12
13
14
15
16
17
<html xmlns:th="http://www.thymeleaf.org">

<head>
</head>

<body>
    <th:block th:each="pageNumber : ${#numbers.sequence(startPage, endPage)}">
        <!-- style 속성 : 해당 요소를 꾸며주기 위해 사용
                여러 속성값을 사용할 때에는 ;로 구분 -->
        <span th:if="${page} == ${pageNumber}" th:text="${pageNumber}"
            style="font-weight: bold; color: blue;"></span>
        <span th:unless="${page} == ${pageNumber}" th:text="${pageNumber}"
            style="color: crimson;"></span>
    </th:block>
</body>

</html>
http://localhost:8080/pagination?page=12

Link Url Expression - @{ … }
- th:href 사용 : @{주소(파라미터=값)}
file\src\main\java\com\example\basic\controller\ThymeleafController.java
Java
1
2
3
4
5
6
7
8
9
10
11
12
13
14
15
16
...

@GetMapping("linkUrl")
public String linkUrl(Model model, @RequestParam(defaultValue = "1") int page) {
    int startPage = 1;
    if (page > 4) {
        startPage = page - 4;
    }
    int endPage = startPage + 8;
    model.addAttribute("startPage", startPage);
    model.addAttribute("endPage", endPage);
    model.addAttribute("page", page);
    return "linkUrl";
}

...
file\src\main\resources\templates\linkUrl.html
HTML
1
2
3
4
5
6
7
8
9
10
11
12
13
14
15
16
17
18
19
20
21
22
23
24
25
<html xmlns:th="http://www.thymeleaf.org">

<head>
</head>

<body>
    <!-- a태그 : html에서 특정 주소 값으로 이동 시켜주는 버튼
            href속성 : a태그에서 사용하는 문법, 이동시킬 주소를 명시해준다. -->
    <!-- 기본 a태그 -->
    <a href="/">홈으로 이동</a><br />
    <th:block th:each="pageNumber : ${#numbers.sequence(startPage, endPage)}">
        <!-- 기본 a태그의 href속성에 thymeleaf 구문을 사용하면 인식이 안된다-->
        <!-- <a href="/linkUrl?page=$(pageNumber)">[[${pageNumber}]]</a> -->
        <!-- thymeleaf의 href사용 -->
        <th:block th:if="${page} == ${pageNumber}">
            <span th:text="${pageNumber}" style="font-weight: bold; color: blue;"></span>
        </th:block>
        <th:block th:unless="${page} == ${pageNumber}">
            <a th:href="@{/linkUrl(page=${pageNumber})}" th:text="${pageNumber}"
                style="color: crimson;"></a>
        </th:block>
    </th:block>
</body>

</html>
http://localhost:8080/linkUrl?page=23

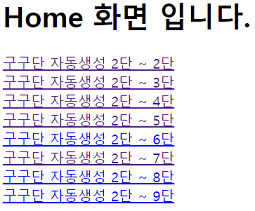
연습1
- 구구단 출력페이지를 thymelaef a태그를 이용해 생성해보자
file\src\main\resources\templates\home.html
HTML
1
2
3
4
5
6
7
8
9
10
11
12
13
<html xmlns:th="http://www.thymeleaf.org">

<head>
</head>

<body>
    <h1>Home 화면 입니다.</h1>
    <th:block th:each="danNum : ${#numbers.sequence(2, 9)}">
        <a th:href="@{/gugudan(dan=${danNum})}">구구단 자동생성 2단 ~ [[${danNum}]]단</a><br />
    </th:block>
</body>

</html>
http://localhost:8080/
연습2
- 홈화면에 userlist로 가는 항목을 추가해보자
file\src\main\resources\templates\home.html
HTML
1
2
3
4
5
...

<a href="userlist">사용자 목록</a>

...
- 유저목록에서 이름을 누르면 해당 유저의 페이지로 가도록 해보자
file\src\main\resources\templates\userList.html
HTML
1
2
3
4
5
6
7
8
9
10
11
12
13
14
15
16
17
18
19
20
21
22
23
<html xmlns:th="http://www.thymeleaf.org">

<head>
</head>

<body>
    <table border="1">
        <tr>
            <td>아이디</td>
            <td>이름</td>
            <td>비밀번호</td>
        </tr>
        <tr th:each="member : ${memberList}">
            <td th:text="${member.userId}"></td>
            <td>
                <a th:href="@{member(userId=${member.userId})}">[[${member.name}]]</a>
            </td>
            <td th:text="${member.userPassword}"></td>
        </tr>
    </table>
</body>

</html>
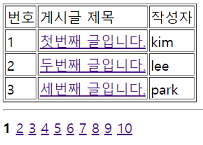
연습3
- 게시판 글 상세보기가 가능하도록 작성해보자
file\src\main\java\com\example\basic\controller\ThymeleafController.java
Java
1
2
3
4
5
6
7
8
9
10
11
12
13
14
15
16
17
18
19
20
21
22
23
24
25
26
27
28
29
30
31
32
33
34
...

@GetMapping("board")
public String board(Model model, @RequestParam(defaultValue = "1") int page) {
    int startPage = (page - 1) / 10 * 10 + 1;
    int endPage = startPage + 9;
    model.addAttribute("startPage", startPage);
    model.addAttribute("endPage", endPage);
    model.addAttribute("page", page);

    List<Board> boardList = new ArrayList<>();
    Board board = new Board();
    board.setBNo(1);
    board.setTitle("첫번째 글입니다.");
    board.setPublisher("kim");
    boardList.add(board);

    board = new Board();
    board.setBNo(2);
    board.setTitle("두번째 글입니다.");
    board.setPublisher("lee");
    boardList.add(board);

    board = new Board();
    board.setBNo(3);
    board.setTitle("세번째 글입니다.");
    board.setPublisher("park");
    boardList.add(board);

    model.addAttribute("boardList", boardList);
    return "board";
}

...
file\src\main\resources\templates\board.html
HTML
1
2
3
4
5
6
7
8
9
10
11
12
13
14
15
16
17
18
19
20
21
22
23
...

<table border="1">
    <tr>
        <td>번호</td>
        <td align="center">게시글 제목</td>
        <td>작성자</td>
    </tr>
    <tr th:each="board : ${boardList}">
        <td th:text="${board.bNo}"></a></td>
        <td>
            <a th:href="@{/boardDetail(bNo=${board.bNo})}">[[${board.title}]]</a>
        </td>
        <td th:text="${board.publisher}"></td>
    </tr>
</table>
<hr>
<th:block th:each="pageNumber : ${#numbers.sequence(startPage, endPage)}">
    <a th:if="${page}==${pageNumber}" th:text="${pageNumber}" style="font-weight:bold"></a>
    <a th:unless="${page}==${pageNumber}" th:href="@{/board(page=${pageNumber})}" th:text="${pageNumber}"></a>
</th:block>

...
http://localhost:8080/board
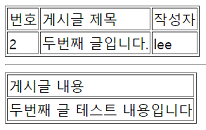
- 상세 페이지
file\src\main\java\com\example\basic\controller\ThymeleafController.java
Java
1
2
3
4
5
6
7
8
9
10
11
12
13
14
15
16
17
18
19
20
21
22
23
24
25
26
27
28
29
30
31
32
33
34
35
36
37
38
39
...

@GetMapping("boardDetail")
public String boardDetail(Model model, @RequestParam int bNo) {
    List<Board> boardList = new ArrayList<>();
    Board board = new Board();
    board.setBNo(1);
    board.setTitle("첫번째 글입니다.");
    board.setContent("첫번째 글 테스트 내용입니다");
    board.setPublisher("kim");
    boardList.add(board);

    board = new Board();
    board.setBNo(2);
    board.setTitle("두번째 글입니다.");
    board.setContent("두번째 글 테스트 내용입니다");
    board.setPublisher("lee");
    boardList.add(board);

    board = new Board();
    board.setBNo(3);
    board.setTitle("세번째 글입니다.");
    board.setContent("세번째 글 테스트 내용입니다");
    board.setPublisher("park");
    boardList.add(board);

    // 파라미터 bNo와 boardList 안에 있는 글의 글번호가 일치하면
    Board result = new Board();
    for (Board b : boardList) {
        if (b.getBNo() == bNo) {
            result = b;
        }
    }
    model.addAttribute("result", result);

    return "boardDetail";
}

...
file\src\main\resources\templates\boardDetail.html
HTML
1
2
3
4
5
6
7
8
9
10
11
12
13
14
15
16
17
18
19
20
21
22
23
24
25
...

<table border="1">
    <tr>
        <td>번호</td>
        <td>게시글 제목</td>
        <td>작성자</td>
    </tr>
    <tr>
        <td th:text="${result.bNo}"></td>
        <td th:text="${result.title}"></td>
        <td th:text="${result.publisher}"></td>
    </tr>
</table><hr>
<table border="1">
    <tr>
        <td>게시글 내용</td>
    </tr>
    <tr>
        <td th:text="${result.content}"></td>
    </tr>
</table>


...
두번째 글입니다.
Click
연습4
- 로그인 직접 입력하기 (post요청)
file\src\main\java\com\example\basic\controller\ThymeleafController.java
Java
1
2
3
4
5
6
7
8
9
10
11
12
13
14
15
16
17
...

@GetMapping("login3")
public String login3() {
    return "login3";
}

@PostMapping("login3")
public String login3(Model model, @RequestParam("id") String id, @RequestParam("pw") String pw) {
    System.out.println("아이디 확인 : " + id);
    System.out.println("비밀번호 확인 : " + pw);
    model.addAttribute("id", id);
    model.addAttribute("pw", pw);
    return "loginResult";
}

...
file\src\main\resources\templates\login3.html
HTML
1
2
3
4
5
6
7
8
9
10
11
...

<h1>로그인 post 메소드 테스트</h1>
<hr/>
<form action="/login3" method="post">
    <input type="text" placeholder="아이디" name="id" />
    <input type="password" placeholder="비밀번호" name="pw" />
    <input type="submit" value="로그인" /> <!-- submit : form타입에 요청 -->
</form>

...
file\src\main\resources\templates\loginResult.html1
HTML
1
2
3
4
5
6
7
8
...

<h1>로그인 post 메소드 테스트</h1>
<hr/>
<h3>[[${id}]] 님 환영합니다.</h3>
<h3>비밀번호 앞 두자리는 [[${#strings.substring(pw, 0, 2)}]] 입니다.</h3>

...
http://localhost:8080/login3

아이디: abc, 비밀번호: 12345 =>
로그인

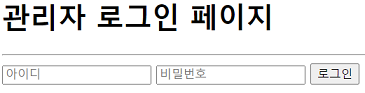
연습5 - Get, Post 매핑 활용
- 다음 조건을 만족시켜보자
- Get요청으로 들어왔을 때는 adminLogin.html로 이동한다.
- adminLogin.html에서는 form태그와 input태그를 활용해서 로그인 기능 적용한다.
- adminLogin.html에서 로그인 시도하게 되면 adminLogin의 post매핑으로 연결한다.
- 이때 파라미터는 id와 pw라고 한다.
- 관리자 계정 정보는 id는 admin, pw는 1234이며 로그인 성공시 adminPage.html로 이동하고 로그인 실패시 loginFail.html로 이동한다.
file\src\main\java\com\example\basic\controller\ThymeleafController.java
Java
1
2
3
4
5
6
7
8
9
10
11
12
13
14
15
16
17
18
19
...

@GetMapping("adminLogin")
public String adminLogin() {
    return "adminLogin";
}

@PostMapping("adminLogin")
public String adminLogin(@RequestParam Map<String, Object> map) {
    String adminId = "admin";
    String adminPw = "1234";
    if (map.get("id").equals(adminId) && map.get("pw").equals(adminPw)) {
        return "adminPage";
    } else {
        return "loginFail";
    }
}

...
file\src\main\resources\templates\adminLogin.html
HTML
1
2
3
4
5
6
7
8
9
10
11
...

<h1>관리자 로그인 페이지</h1>
<hr/>
<form action="/adminLogin" method="post">
    <input type="text" placeholder="아이디" name="id" />
    <input type="password" placeholder="비밀번호" name="pw" />
    <input type="submit" value="로그인" />
</form>

...
http://localhost:8080/adminLogin
아이디: admin, 비밀번호: 1234 =>
로그인

아이디: admin, 비밀번호: 123 =>
로그인

Reference
- 이 포스트는 SeSAC 인공지능 SW 개발자 양성 과정 - 김영식 강사님의 강의내용을 정리한 것입니다.
댓글남기기